

- Connect with Google (Beta): Sign in with your Google account. No JSON key file needed.
- Use Service Account (Advanced): Create a service account in Google Cloud Console and upload the JSON key.
Method 1: OAuth (beta)
OAuth is the faster way to connect. You sign in with your Google account, grant permission, and you are done.Prerequisites
- A Google account with access to Google Play Console
- The account must have “View app information (read only)” and “Reply to reviews” permissions for the apps you want to manage
Steps
1
Start the integration
- Log in to AppReply
- Go to Applications
- Click the three dots next to your app and select Integrate
- Click Connect with Google (labeled “Beta”)
2
Sign in with Google
A browser popup will open with Google’s sign-in page. Select the Google account that has access to your Play Console.Google will ask you to grant AppReply permission to manage your Play Console reviews. On Google’s consent screen, tick the box next to “View and manage your Google Play Developer account”, then click Allow. If you leave that box unticked, AppReply cannot connect.
3
Verify the connection
After you grant permission, AppReply will verify that your account can access the app’s reviews. This usually takes a few seconds.
- If verification succeeds, you will see a green confirmation and your reviews will begin syncing.
- If verification fails, AppReply does not keep the connection. This usually means the Google account does not have the right Play Console permissions for the app. Check the permissions and connect again.
4
Add your other apps
If the same Google account can manage more of your apps, AppReply lists them right after the first one connects. See Connect your other apps in one step.
Troubleshooting OAuth
- Popup blocked: Make sure your browser allows popups from appreply.co. The OAuth sign-in opens in a popup window.
- Wrong account: If you signed in with the wrong Google account, disconnect and reconnect. The sign-in flow will let you pick a different account.
- “You must check the View and manage your Google Play Developer account permission”: Connect again and make sure that checkbox is ticked on Google’s consent screen.
- Verification fails: Your Google account may not have “Reply to reviews” permission in Play Console. Ask the Play Console account owner to grant this permission under Users and permissions, then connect again.
Method 2: Service account
Service accounts are the traditional way to connect. This method requires a few more steps but works well for teams that manage API access through Google Cloud.Prerequisites
- Access to Google Cloud Console
OwnerorAdminaccess to your Google Play Console- Your app published on Google Play Store
Steps
Clicking Use Service Account opens a 7-step wizard in AppReply that walks you through the same setup: the five steps in Google Cloud and Play Console below, then Upload Service Account Key, then the optional Link Play Console bulk reports. If you already have a service account JSON key, for example from another review tool, you can reuse it instead of creating a new one.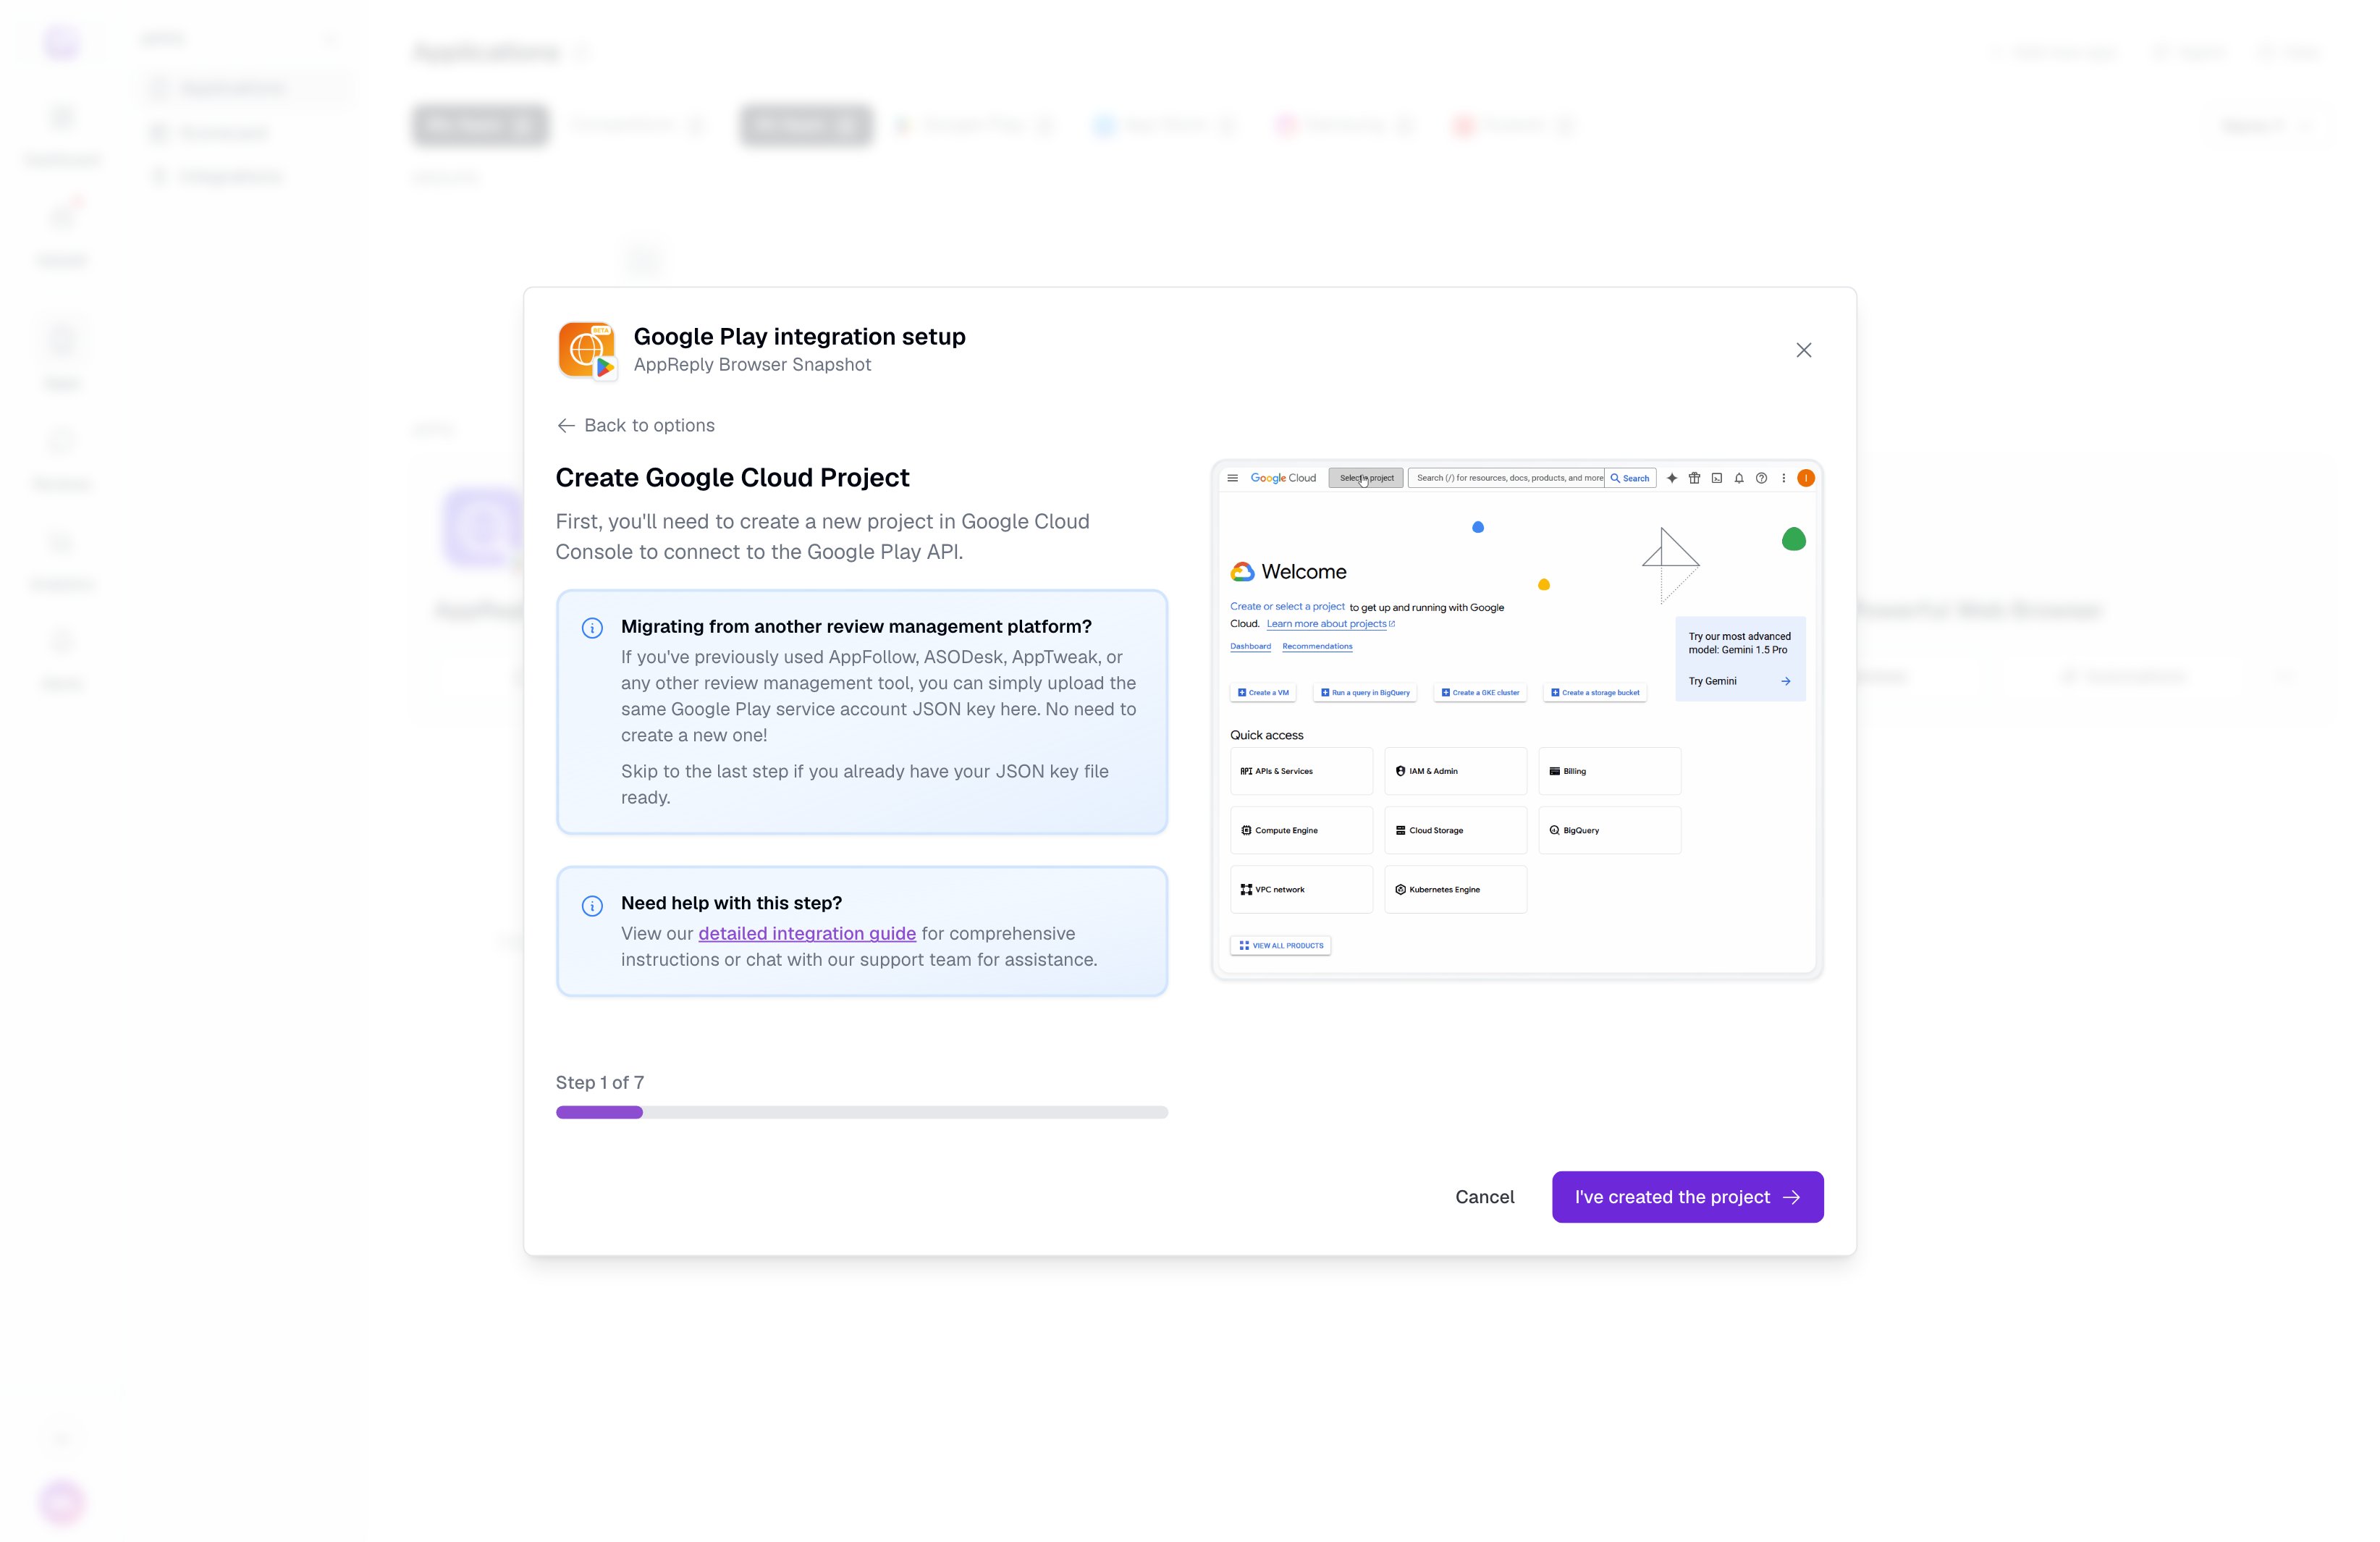
Create a Google Cloud project
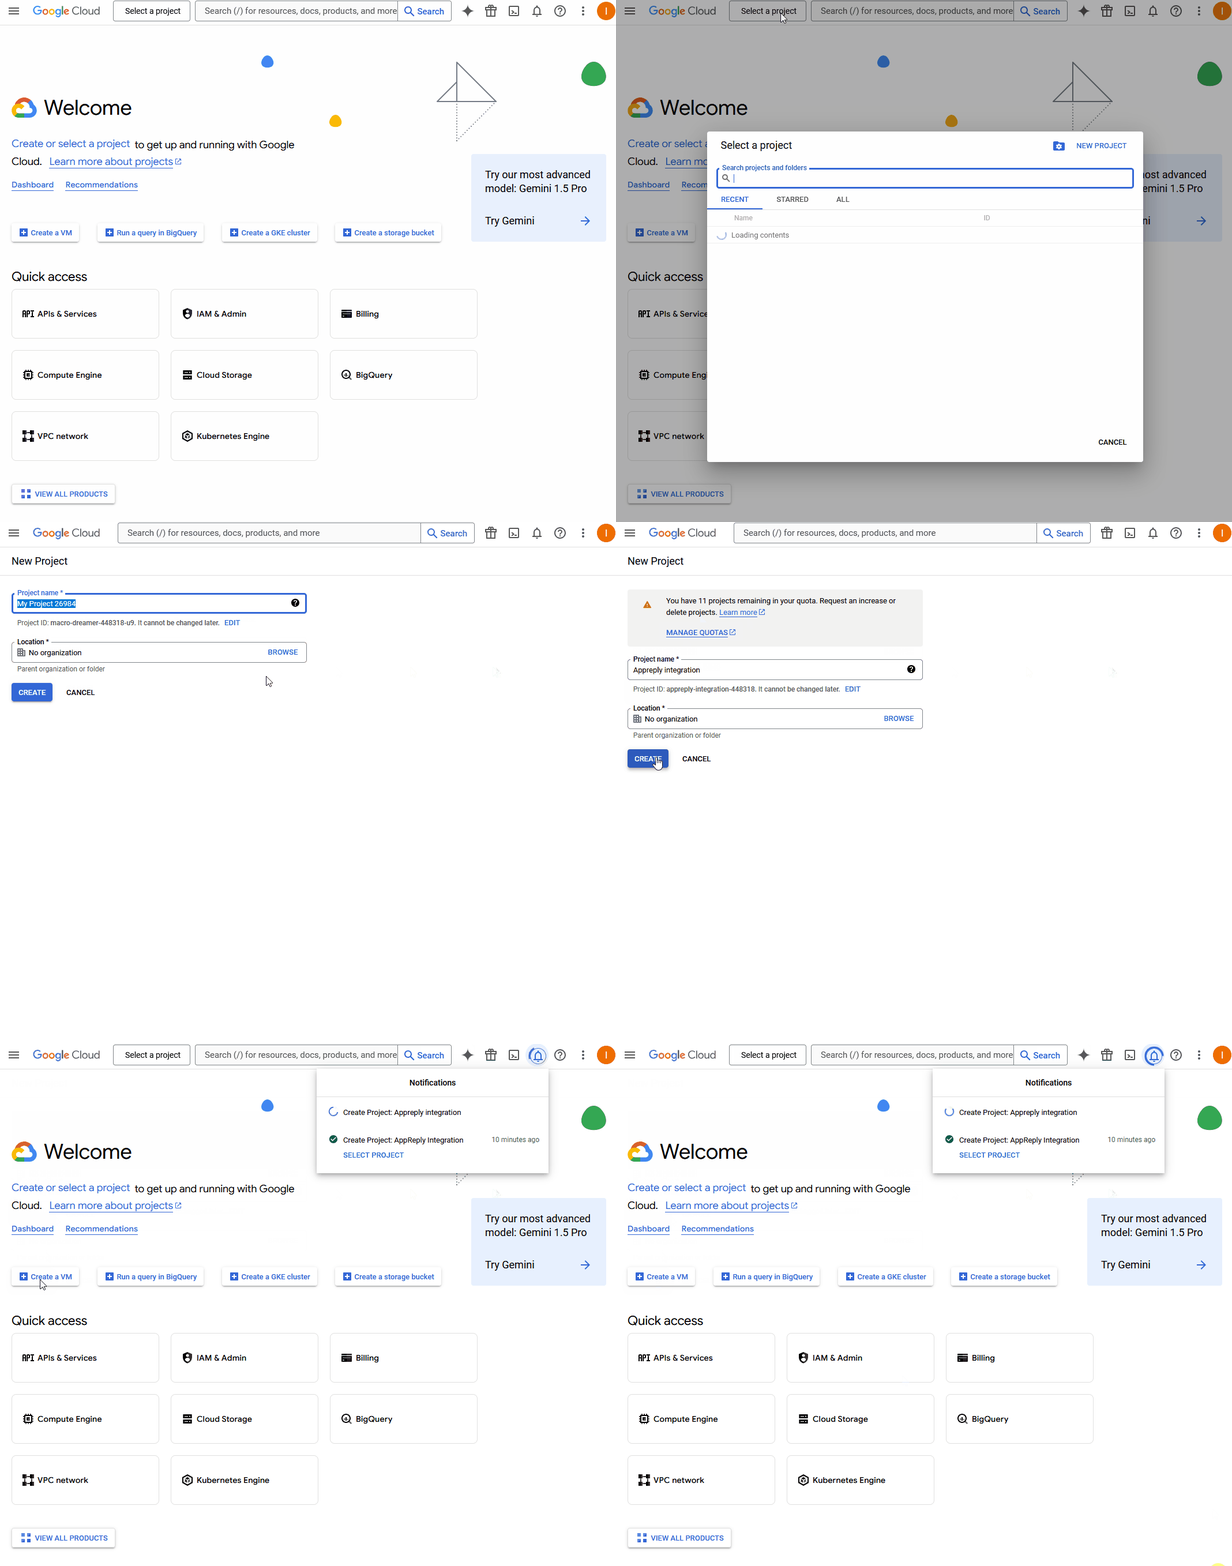
- Go to Google Cloud Console
- Click “Select a project”, then “New Project”
- Name your project (e.g., “AppReply Integration”)
- Click “Create”
Enable the Google Play Android Developer API
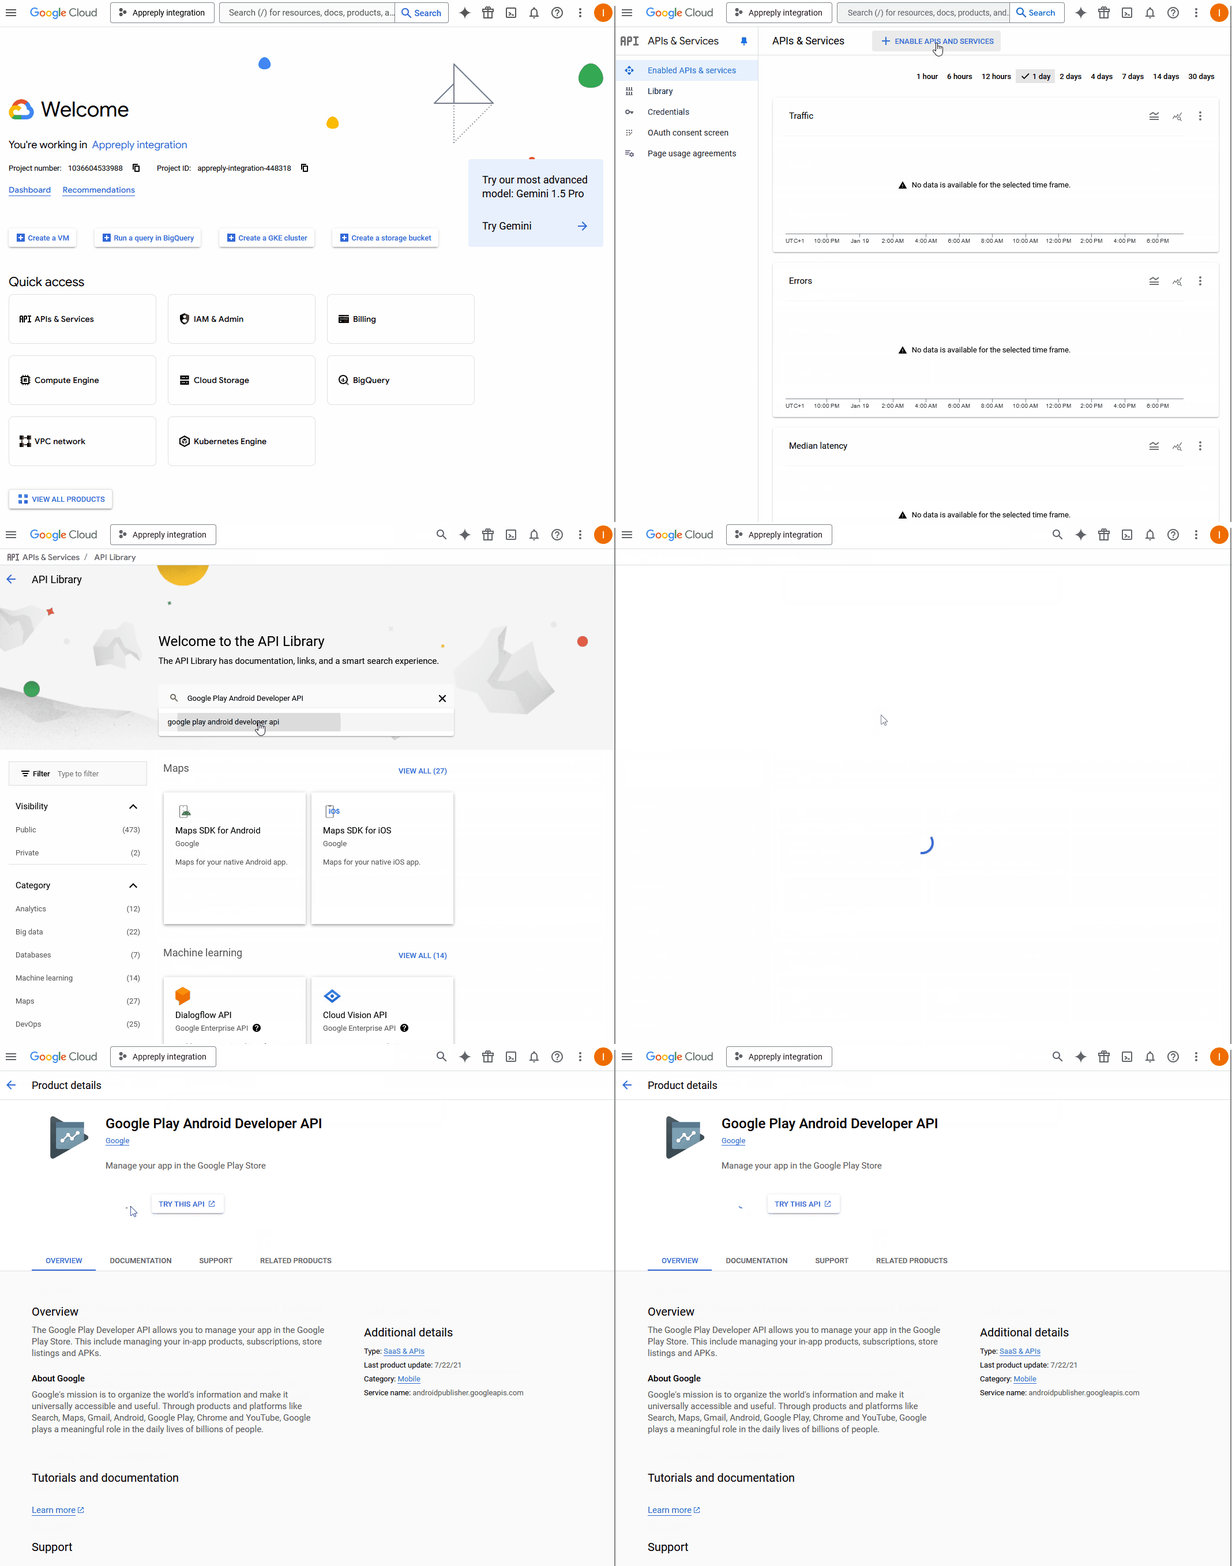
- In your new project, go to “APIs & Services”, then “Library”
- Search for and enable “Google Play Android Developer API”
Create a service account
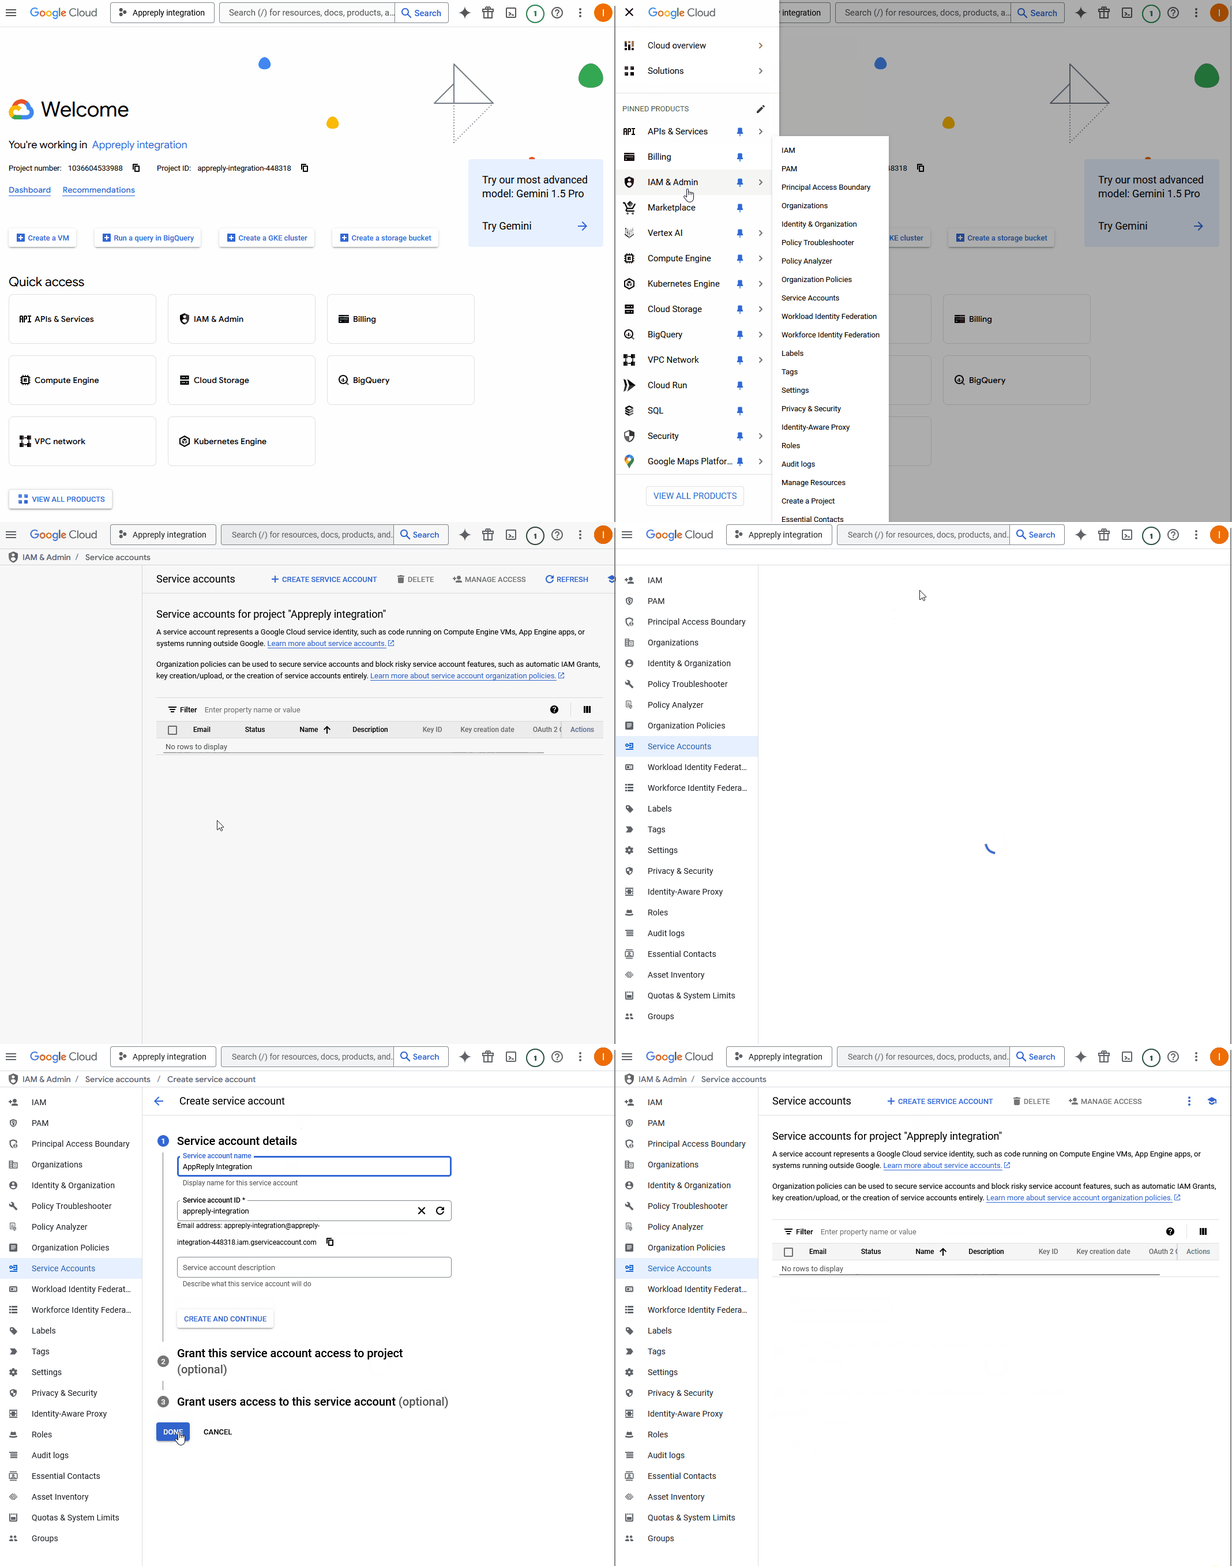
- Go to “IAM & Admin”, then “Service Accounts”
- Click “Create Service Account”
- Fill in the details:
- Name: “AppReply Integration”
- ID: Will be auto-generated
- Description: “Service account for AppReply.co integration”
- Click “Create and Continue”
- Skip role assignment (roles will be set in Play Console)
- Click “Done”
Generate a JSON key
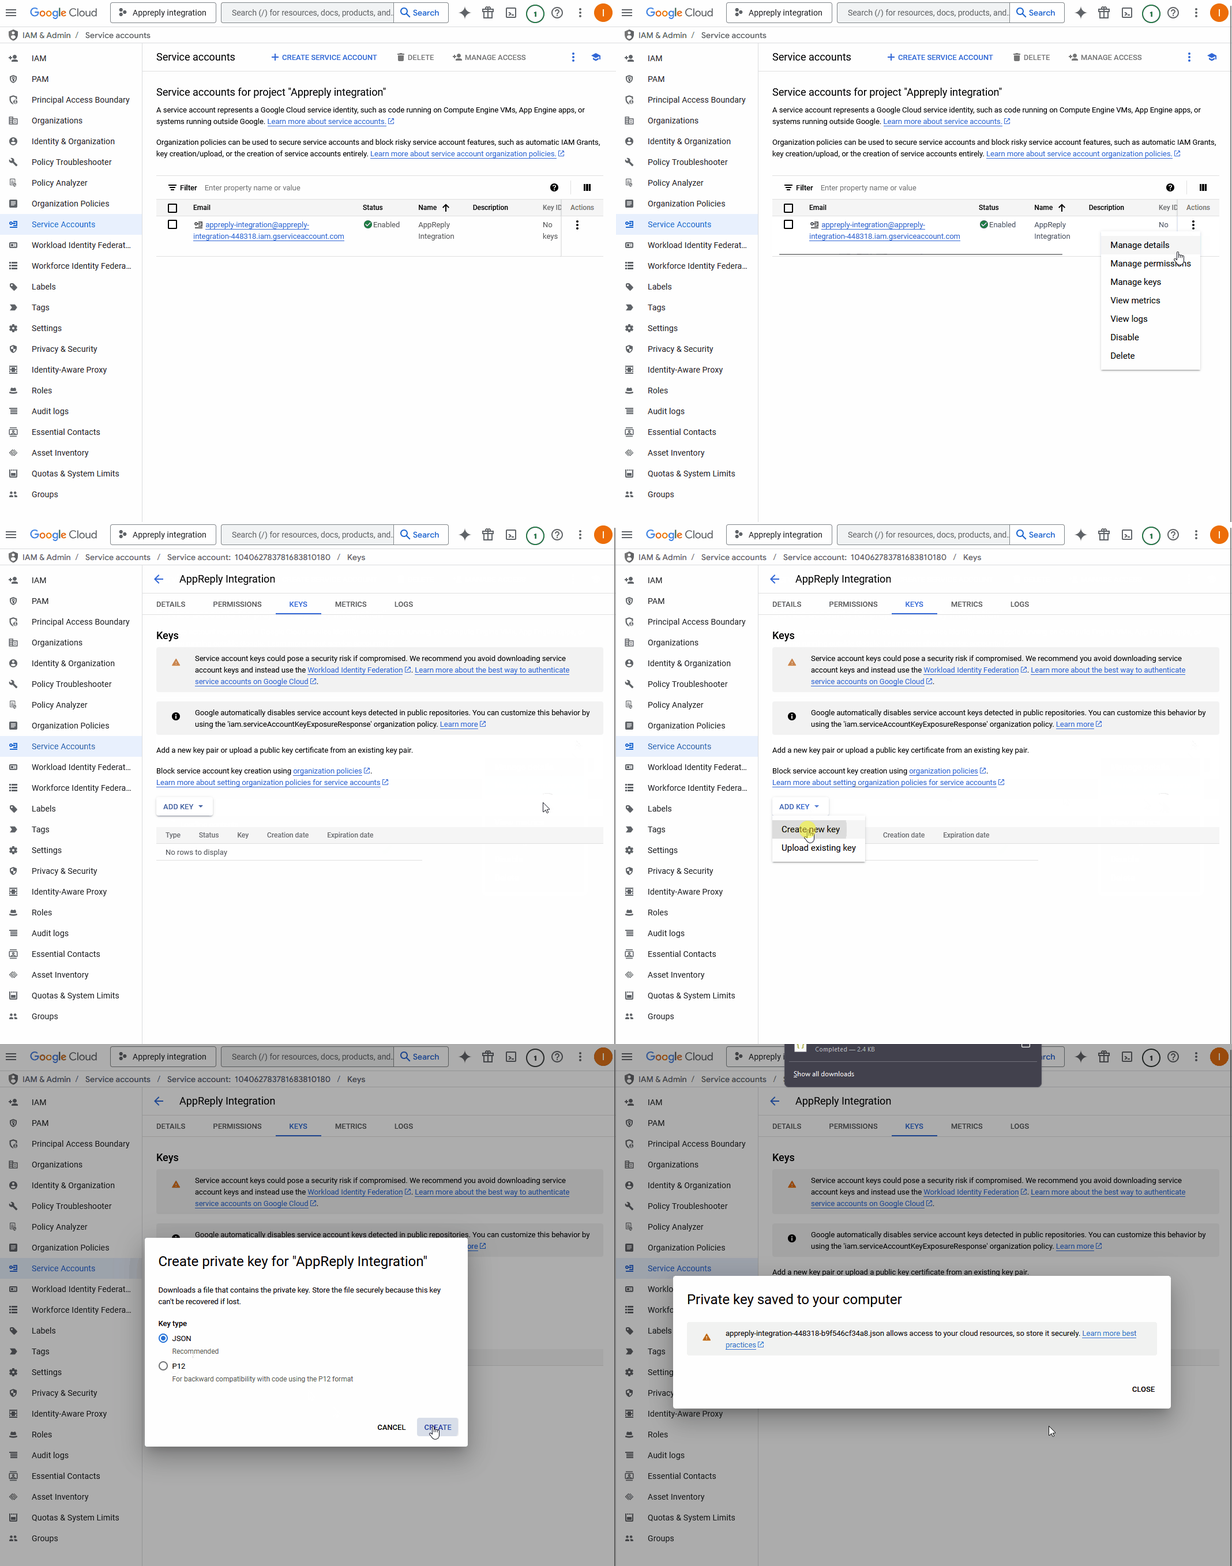
- Find your new service account in the list
- Click the three dots (⋮), then “Manage keys”
- Click “Add Key”, then “Create new key”
- Select “JSON” format
- Click “Create” to download the key file
- Keep this file secure - it contains sensitive credentials
- You’ll need to upload this file to AppReply
Link to Google Play Console
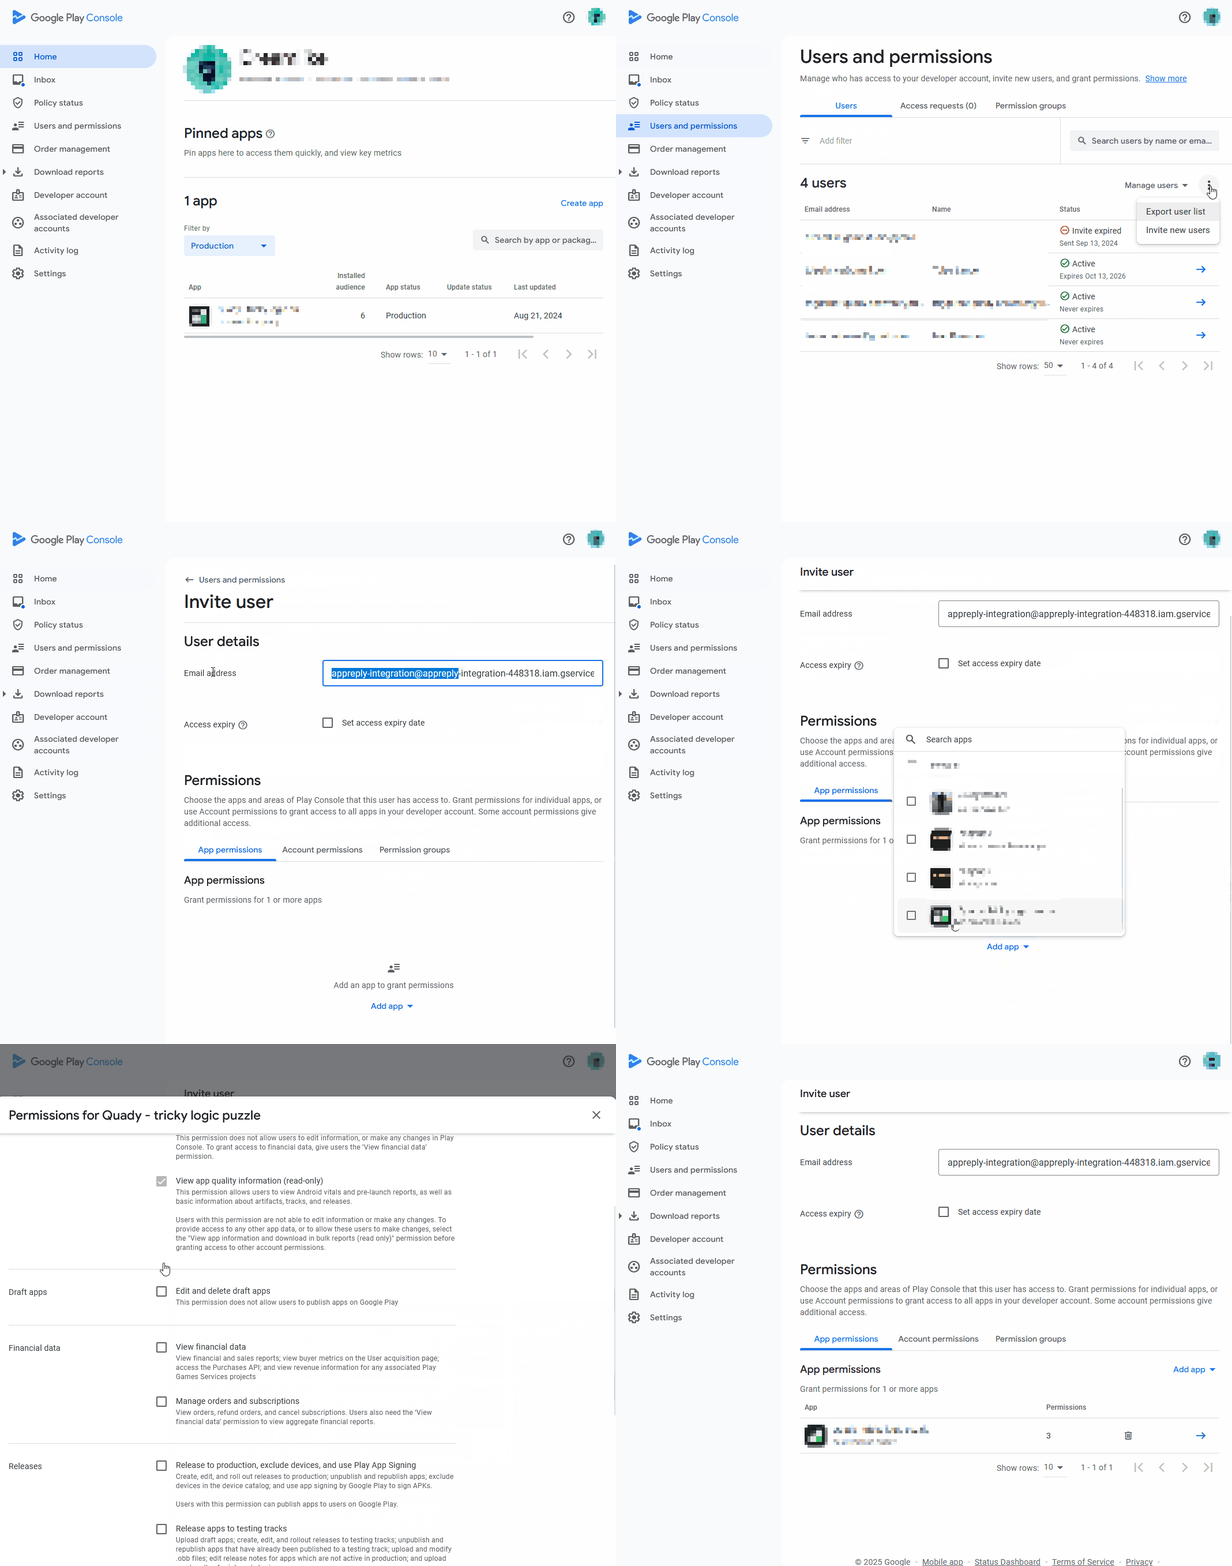
- Open Google Play Console
- Go to “Users and permissions” (left sidebar)
- Click the three dots (⋮), then “Add new users”
- Insert service account generated email address
- Configure permissions:
- Select “App permissions”, then “View app information (read only)”
- Enable “Reply to reviews” permission
- Select your apps or “Select all current and future apps”
- Click “Invite user” to save changes
Finish integration in AppReply
- Log in to AppReply
- Go to Applications
- Click the three dots next to the app and select Integrate
- Click Use Service Account
- Upload the JSON key file you downloaded earlier
- Click Complete Integration
Troubleshooting service accounts
- API not enabled: Make sure the “Google Play Android Developer API” is enabled in your Google Cloud project.
- Permission errors: Verify the service account has “Reply to reviews” permission in Play Console under Users and permissions.
- Connection failed: Check that the JSON key file is the correct one and has not been revoked.
Connect your other apps in one step
One Google sign-in, or one service account key, usually covers every app you manage in Play Console. So after your first Google Play app connects, AppReply looks up the other apps from the same developer and checks which of them the same sign-in or key can manage.1
Pick the apps
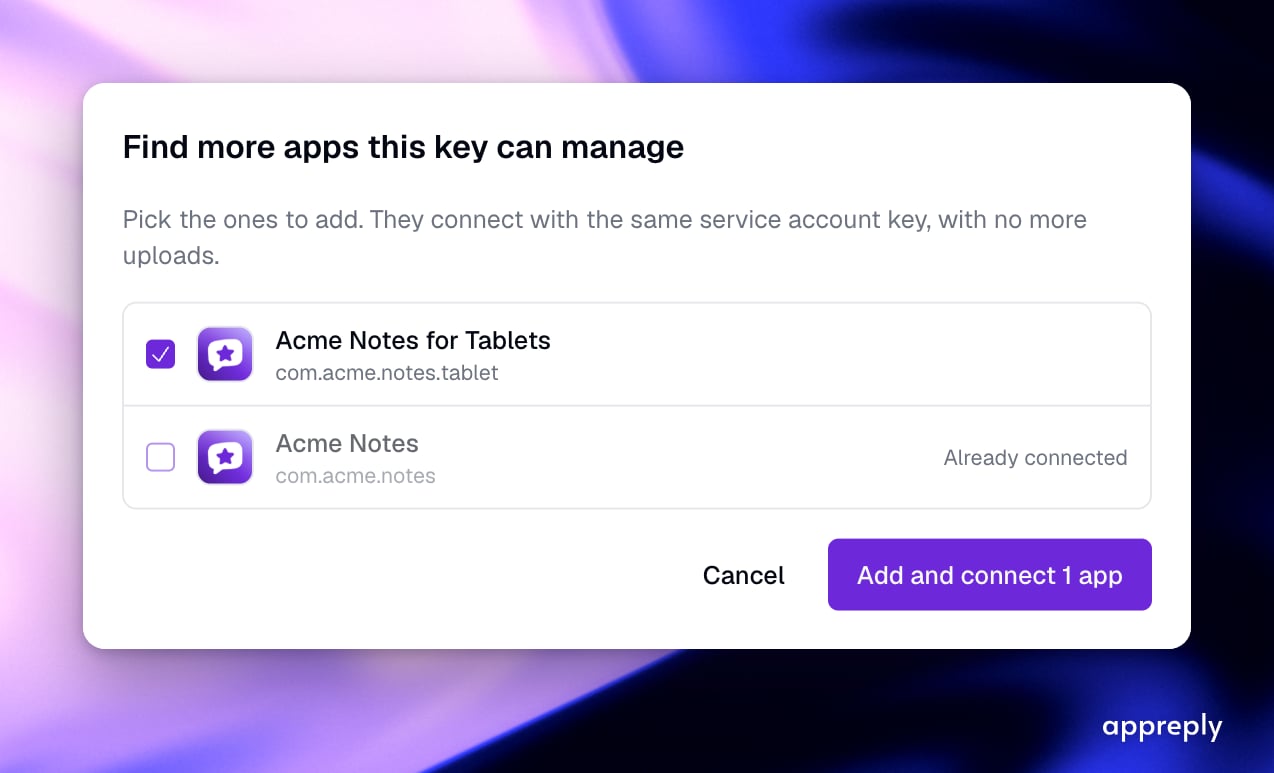
- No access: the app exists, but the sign-in or key has no permission for it in Play Console. Grant the permission there, then open the list again.
- Could not check: Google did not confirm access just now. Try again in a few minutes, or connect the app on its own.
- Already connected: nothing to do.
- Trial limit: your trial has no room for this app. Untick another app to pick it, or upgrade.
2
Add and connect
Click Add and connect. AppReply adds the apps that are new, connects each one, and confirms review access for each. No further sign-ins or uploads are needed. A summary shows which apps connected and, for any that did not, why.
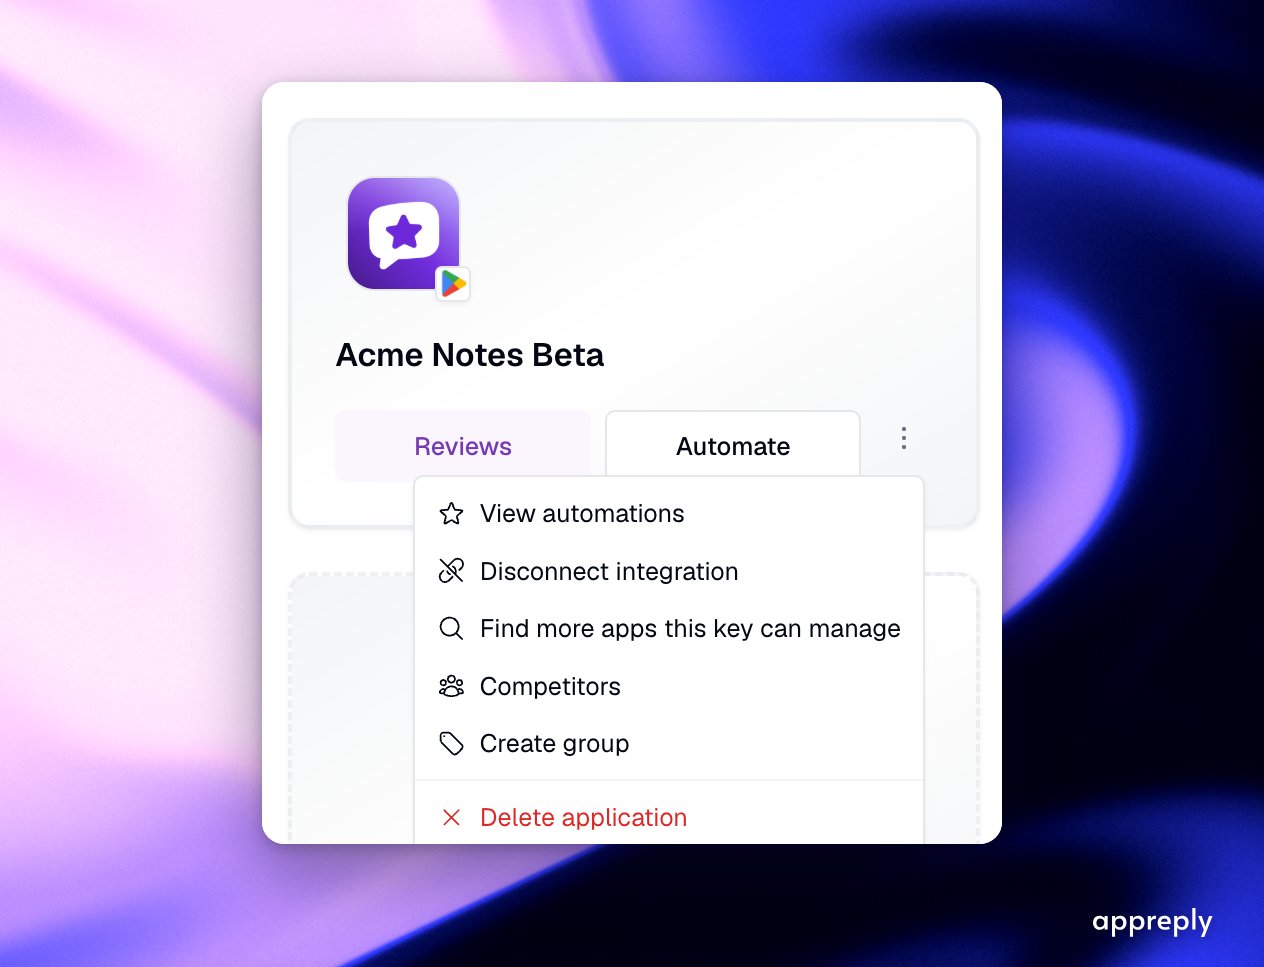
Connecting an app that is already in your workspace
When you click Integrate on an app that is not connected yet, AppReply first checks whether a sign-in or key you already use on another Google Play app can manage it. If it can, the first option is Use the … from that app: one click connects it, with nothing to sign in to or upload. The option only appears after Google confirms the access. Otherwise you see Connect with Google and Use Service Account as usual.The list comes from your developer page on Google Play, so an app that is not public yet does not appear. Add it from Applications and connect it on its own.
- Trial workspaces can hold a limited number of apps. AppReply adds as many as fit and tells you which ones were left out.
- Disconnecting one app does not affect the others that share the same sign-in or key.
- Changing the key or sign-in on one app does not update the others. Reconnect each app you want to move.
Verification
After completing either integration method, AppReply will:- Verify your credentials
- Test the connection to Google Play
- Begin syncing your reviews (usually within 5-15 minutes)
Security notes
- Your credentials are encrypted before being stored
- Both OAuth and service accounts only need minimal permissions to function
- You can revoke access at any time in Google Play Console (for service accounts) or your Google account settings (for OAuth)
Getting support
- Click the chat bubble in the bottom right corner of your dashboard
- Email: help@appreply.co
- Response time: usually within 24 hours during business hours
- Include screenshots of your Play Console settings for faster assistance